ScanXm Instructions

ScanXm is designed to be intuitive and easy to use, with most operations requiring only a single click of the button. While the goal is to create an interface so intuitive that it needs no explanation, a detailed description of the user interface is provided below.

Tutorials (older version)

Basic Navigation

Image Processing

Image Segmentation

Menu bar

File
Open Image Alt-I Load an image or volume
Open DICOM Alt-D Load a DICOM folder. Make sure it is the folder containing the .dcm files ! If the folder contains more studies you will be asked to select one.
Open Mask Alt-M Load a mask
Open DICOM as Mask Alt-N Load a DICOM folder as a mask
Open Mesh Alt-E Load a mesh file
Save Image Ctrl-I Save the current image or volume
Save Image as DICOM Ctrl-D Save the current image or volume as a DICOM in a folder
Save Mask Ctrl-M Save the mask
Save Mask as Contours Ctrl-J Save the mask as RT Struct or GeoJSON by generating contours in the x-y plane
Save Mask as DICOM Ctrl-N Save the mask as a DICOM in a folder
Save Mesh Ctrl-E Save the mesh
Export Time Series Ctrl-T Save time series
Export Time Series Mask Ctrl-Y Save time series mask
Exit Alt-X Close the application
Edit
Setting Alt-S Open the settings menu
Undo Ctrl-Z Undo the last operation. You can apply undo only 10 times.
Clear Remove the image/volume, mask and shape data
View
Process Panel Show/hide the Process panel
Segment Panel Show/hide the Segment panel
View Panel Show/hide the View panel
Info Panel Show/hide the Info panel
Output Panel Show/hide the Output panel. The Output panel at the bottom displays real-time information about the operations of ScanXm.
Full Screen... F11 Maximize the window
Help
About... Ctrl-F1 Show ScanXm information including the Device ID
Controls Open a window which details all the mouse and keyboard controls

Right panel

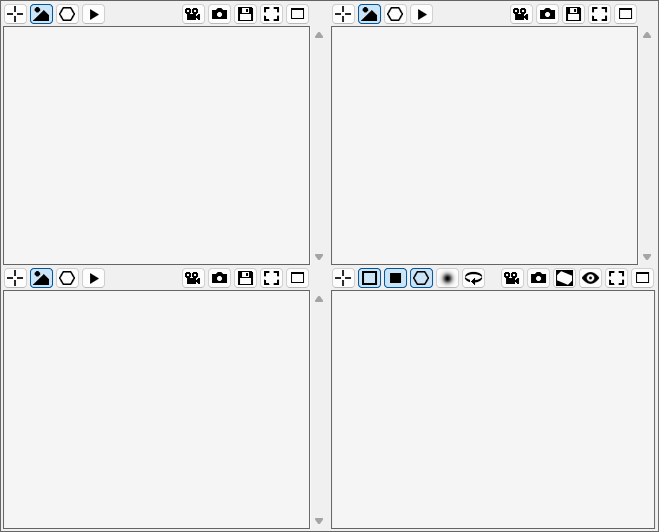
On the right we have a standard four panel view for the volume. It shows the plane for each axis. With the scroll bar you can scroll through the slices. Change the brightness by dragging the mouse with the right button pressed from left to right. Change the contrast by dragging the mouse up and down. This is similar to changing the level and window. With the mouse wheel you can zoom in and out. Holding the middle mouse button allows you to drag the image around.

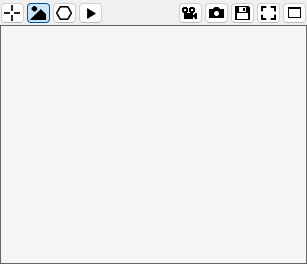
In the top left window we can select what to show using checkboxes with text. These includes from left to right:

A crosshair to indicate the location of the planes.
The mask in case this is available.
The shape in case this is available.
This play button scrolls through the slices.

On the right side we find picture buttons with the following functions:

The movie camera allows you to make a movie
The photo camera allows you to make a screenshot
Save the shown slice of the image or mask.
Fits the image to the screen
With this button the window this button belongs to will span accros all 4 windows, and the other windows will disapear.
This button will resore the view to all four windows.

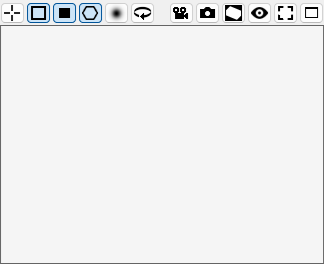
The bottom right gives us the 3D view. This view again has a top bar with on the left the following checkboxes:

A crosshair to indicate the location of the planes.
Show or hide the outline.
Show or hide the cross sections.
Show the surface mesh.
Show or hide the volume rendering
Rotate the scene. The speed can be set in the settings.

On the right you can again see some picture buttons with the following functions:

Select the location of the slices or set the camera focal point on mesh when using depth of field rotate the volume
Rotate the volume
Movie camera you can then make a movie
The photo camera allows you to make a screenshot
Generate an oblique View perpendicular to view direction, pressing again will fix this view
Toggle various preset views
Fits the image to the screen
With this button the window this button belongs to will span accros all 4 windows, and the other windows will disapear.
This button will resore the view to all four windows.

View panel

The panel on the left has an upper and lower part. Both parts have tabs that provide an interface for the functions of ScanXm. The top panel has a "Process" and "Segment" panel. The bottom panel has a "Info" and "View" panel. The "Info" gives an overview of the image and surface properties when available. In the "View" panel you can change many of the visual properties in ScanXm as detailed below.

Camera
Store camera position for all view panels
Restore camera position for all view panels
Restore camera positions in each view to default
In each view the volume/image is fitted into the viewing area
Toggle button when selected you can zoom in/out
Appearance and navigation
Select the colormap used in the slices of a scalar volume.
Background:
Select the backgound color
Outline:
Select the color of the box outline
interpolation
Use a bilinear interpolation to make the images appear smooth instead of seeing the individual pixels/voxels.
anti-aliasing
This option can be used to smooth the edges of the lines.
allow roll
If not checked the volume in the bottom right view will remain upright.
Window
The window level defining the centre point of the intensity range.
The window width defining the range of grey scale values.
Reset the window level and width to encompass the entire range of intensity values.
Mask
Opacity:
Adjust the transparency of the mask.
Lights
cam
The light originates from the camera position.
45°
The light is at a 45 degree angle from the top.
top
The light is pointing down from the camera view.
sky
The light is shining down in the z-direction as if from the sky.
Volume rendering
Select a preset transfer function.
Show the bounding box to constrain the volume rendering.
Opacity:
Set the transparency of the volume rendering.
shading
Add shading in the volume rendering.
cinematic
Perform cinematic rendering.
Shape
Set the type of visualization for the surface mesh.
Opacity:
Set the transparency when transparent mesh rendering is selected.
occlusion
Add ambient occlusion to the mesh rendering.
depth of field
Add depth of field to the mesh rendering.
Guides
axis
Show the x, y and z-axis direction.
scale
Add a scale bar.
legend
Add a color legend.
Set the units for the scale bar.
Set the text that is displayed with the scalebar.

Process panel

The "Process" panel provides various tools to modify the image. This includes tools to set the image properties, crop or resample the image, and various filters.

Cropping
Show the box region of interest.
Fit the box to the tissue.
Fit the box to the mask.
Reset the box to the total volume region.
Crop the volume to the box region.
expandable
Allow the box to expand beyond the region of the volume.
fix region size
Fix the size of the box to the values below.
Region size:
The size in the x, y and z-direction of the box when fix region size is checked.
Intensity normalization
Normalize the volume to have the given minimum and maximum value.
Artificial Intelligence (Internal)
Select one of the AI processing functions.
Run the selected AI processing fuction.
Filter
Denoise the volume using a kernel with the given radius.
Smooth the volume using a gaussian with the given sigma.
Sharpen the volume using a gaussian with the given sigma.
Reformatting
Change the axis according to the X, Y and Z order selected in the dropdown list.
Flip the image or volume in the selected axis.
Set the pixel/voxel spacing.
Set the origin for the image or volume.
Resampling
Resample the colume to the selected pixel/voxel spacing.
This defines the interpolation method.

Segment panel

The "Segment" panel has all the function to be able to generate a segmentation of the structures in the image. This includes automatic segmentations, but also tools to manually annotate the images. It also has a wide range of filters to further process the label map. Finally, it also includes fuctions to generate a surface mesh from the label maps.

Thresholding
Find the thresholds automatically using the Otsu method. Select the number of labels to find the threshold for below.
Change the label to the selected label by clicking on the other label in the slice view.
Select a set of pixels by drawing a region. The greyscale or color values of these pixels wil be used to update the threshold of values of the selected label.
Pressing this button will open a window with scrollbars to manually adjust the threshold values.
This will move the thresholds of multiple labels together.
The number of labels to find the threshold for.
Artificial Intelligence (Internal)
Select the organ to segment automatically.
Show the bounding box to constrain the AI segmention. Moving the box to only the region of interest will make the automatic segmentation faster.
Run the AI based automatic segmentation.
Annotate
Use the paintbrush to draw label values on the mask.
Use the pen delineation tool to draw regions in the image to fill with the label value.
The flood fill tool will fill an entire label region with the selected label value.
This will interpolate a mask in the current slice using the masks of the slices before and after it.
This will interpolate the masks for all slices in between the slices that already have a mask.
Select which label values can be overwritten.
Select how the region is defined in a flood fill operation.
This defined in which direction the label is interpolated. This can be one of the axis and in the time direction in case of a video.
Filter
Perform below operations only on the selected label or all labels.
Apply a dilation operation with the below radius on the mask of the selected label.
Apply a erosion operation with the below radius on the mask of the selected label.
Apply a opening operation with the below radius on the mask of the selected label.
Apply a closing operation with the below radius on the mask of the selected label.
Fill all holes in the mask of the selected label.
The radius of the kernel used in the morphological operation.
This defines in which direction the morpological operation is performed. If "3D" is selected it is performed volumetrically. Otherwise it is applied in the repective plane.
Keep only the largest region.
Remove the regions smaller than the minimum size defined below.
Remove the regions larger than the maximum size defined below.
Remove the regions smaller than the minimum size and larger than the maximum size defined below.
Keep only the regions smaller than the minimum size and larger than the maximum size defined below.
The minimum size used in the above region based operations.
The maximum size used in the above region based operations.
Denoise the mask using a majority filter with a radius defined below.
Smooth the mask using a gaussian filter with a sigma defined below.
Perform opening operations with increasing diameter until there are no more handles.
Perform closing operations with increasing diameter until there are no more handles.
Relabel the smaller connected regions of each label to form a segmentation with only one connected region for each label.
Denoising kernel radius.
Ammount of smoothing.
Meshing
Add a surface mesh for the selected label.
Remove the surface mesh for the selected label.
Add a surface mesh of every label.
Generate a surface mesh of all the labels merged together.
Remove all the meshes.
The number of surface smoothing iterations.
Decimation factor. The higher the value, the more the mesh will be simplified.
mask color
Give the mesh the color of the mask label.
add boundary
Close the mesh at the edges of the volume.

API panel

The "API" panel provides a connection with the ScanXm server running either on the cloud or locally. It allows the user to run advanced AI models directly from ScanXm.

Inputs
Enter the URL of the ScanXm server.
Connect to the ScanXm server. This operation will add the available models to the dropdown box below.
This will contain all the available models when the connect button is pressed. Select the model you wish to run here.
Run the selected model.
Draw a rectangular region in the image of the bottom left panel
Set a point/landmark in the bottom left panel.
Send the mask to the ScanXm Server.
Apply model over all slices in the z-direction, or over all timepoints.
Reset the server information.
Turn on text to speech. Your speech will be recorded, converted to text and placed in the text box below.
Turn on conversation mode. The text generated from your speech will be send directly to the server to communicate with the LLM.
Attache a file such as an image, text file or PDF to the input. This will be sent to the ScanXm server when the send buton is pressed.
Send the text from the text box below to the ScanXm server.
Turn on text to speech. The text produced by the LLM will be converted to speech.
Enter the text you want to send to the ScanXm server.